0. 배경
프로젝트 진행 중, 프론트엔드 개발자분이 로그인 API가 Swagger 문서에 없다는 말씀을 하셨고, 확인해보니 Swagger 문서에 API가 존재하지 않았습니다.
이번 프로젝트에서는 Security를 활용하여 인증/인가를 구현하였고, Springdoc은 Spring Security 필터를 자동으로 등록해주지 않습니다.
/login 엔드포인트를 문서에서 확인하기 위해서는 추가 설정이 필요합니다.
Swagger를 보다 효율적으로 활용하기 위한 과정입니다.
1. 문제점이 존재하는 방법 - yml 설정 파일로 end-point 추가

https://springdoc.org/#how-can-i-make-spring-security-login-endpoint-visible
OpenAPI 3 Library for spring-boot
Library for OpenAPI 3 with spring boot projects. Is based on swagger-ui, to display the OpenAPI description.Generates automatically the OpenAPI file.
springdoc.org
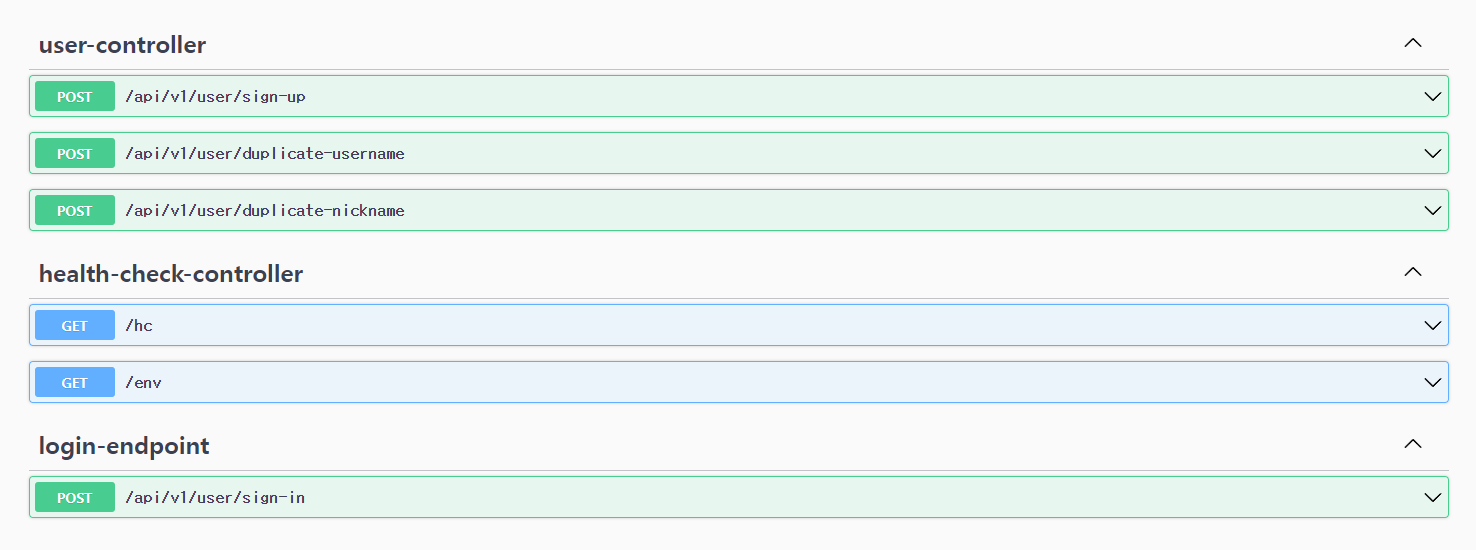
yml 파일에 show-login-endpoint: true를 작성하였을 때 Swagger 문서에 login-endpoint가 잘 나타나는 것을 확인할 수 있습니다.
실제 추가된 것을 확인하겠습니다.


Swagger 문서에 나타났음에도 불구하고 아직 문제가 해결되지 않았습니다.
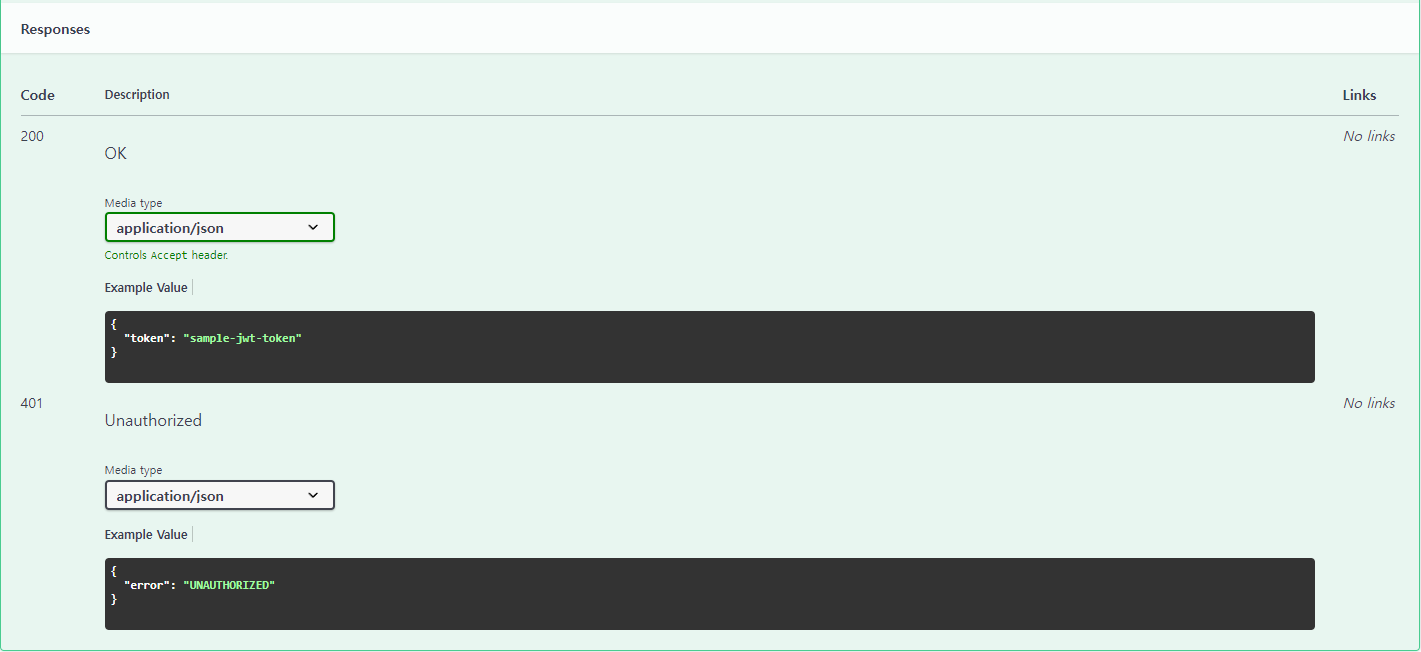
1. 응답값, 요청값에 어떤 값이 들어가는지 자세하게 알 수 없습니다.
2. UserController에 대한 API와 login API가 따로 분리되어 한 눈에 보기 어렵습니다.
3. 로그인 실패에 대한 응답은 403이 아닌 401이 맞습니다.
이러한 문제를 해결하기위해 직접 커스텀하여 작성해보겠습니다.
2. Springdoc 오픈소스 Login Endpoint 확인
springdoc 오픈소스에 org.springdoc.core.configuration.SpringDocSecurityConfiguration에 있는 코드를 확인해보겠습니다.
@Bean
@ConditionalOnProperty(SPRINGDOC_SHOW_LOGIN_ENDPOINT)
@Lazy(false)
OpenApiCustomizer springSecurityLoginEndpointCustomiser(ApplicationContext applicationContext) {
    FilterChainProxy filterChainProxy = applicationContext.getBean(AbstractSecurityWebApplicationInitializer.DEFAULT_FILTER_NAME, FilterChainProxy.class);
    return openAPI -> {
       for (SecurityFilterChain filterChain : filterChainProxy.getFilterChains()) {
          Optional<UsernamePasswordAuthenticationFilter> optionalFilter =
                filterChain.getFilters().stream()
                      .filter(UsernamePasswordAuthenticationFilter.class::isInstance)
                      .map(UsernamePasswordAuthenticationFilter.class::cast)
                      .findAny();
          Optional<DefaultLoginPageGeneratingFilter> optionalDefaultLoginPageGeneratingFilter =
                filterChain.getFilters().stream()
                      .filter(DefaultLoginPageGeneratingFilter.class::isInstance)
                      .map(DefaultLoginPageGeneratingFilter.class::cast)
                      .findAny();
          if (optionalFilter.isPresent()) {
             UsernamePasswordAuthenticationFilter usernamePasswordAuthenticationFilter = optionalFilter.get();
             Operation operation = new Operation();
             Schema<?> schema = new ObjectSchema()
                   .addProperty(usernamePasswordAuthenticationFilter.getUsernameParameter(), new StringSchema())
                   .addProperty(usernamePasswordAuthenticationFilter.getPasswordParameter(), new StringSchema());
             String mediaType = org.springframework.http.MediaType.APPLICATION_JSON_VALUE;
             if (optionalDefaultLoginPageGeneratingFilter.isPresent()) {
                DefaultLoginPageGeneratingFilter defaultLoginPageGeneratingFilter = optionalDefaultLoginPageGeneratingFilter.get();
                Field formLoginEnabledField = FieldUtils.getDeclaredField(DefaultLoginPageGeneratingFilter.class, "formLoginEnabled", true);
                try {
                   boolean formLoginEnabled = (boolean) formLoginEnabledField.get(defaultLoginPageGeneratingFilter);
                   if (formLoginEnabled)
                      mediaType = org.springframework.http.MediaType.APPLICATION_FORM_URLENCODED_VALUE;
                }
                catch (IllegalAccessException e) {
                   LOGGER.warn(e.getMessage());
                }
             }
             RequestBody requestBody = new RequestBody().content(new Content().addMediaType(mediaType, new MediaType().schema(schema)));
             operation.requestBody(requestBody);
             ApiResponses apiResponses = new ApiResponses();
             apiResponses.addApiResponse(String.valueOf(HttpStatus.OK.value()), new ApiResponse().description(HttpStatus.OK.getReasonPhrase()));
             apiResponses.addApiResponse(String.valueOf(HttpStatus.FORBIDDEN.value()), new ApiResponse().description(HttpStatus.FORBIDDEN.getReasonPhrase()));
             operation.responses(apiResponses);
             operation.addTagsItem("login-endpoint");
             PathItem pathItem = new PathItem().post(operation);
             try {
                Field requestMatcherField = AbstractAuthenticationProcessingFilter.class.getDeclaredField("requiresAuthenticationRequestMatcher");
                requestMatcherField.setAccessible(true);
                AntPathRequestMatcher requestMatcher = (AntPathRequestMatcher) requestMatcherField.get(usernamePasswordAuthenticationFilter);
                String loginPath = requestMatcher.getPattern();
                requestMatcherField.setAccessible(false);
                openAPI.getPaths().addPathItem(loginPath, pathItem);
             }
             catch (NoSuchFieldException | IllegalAccessException |
                   ClassCastException ignored) {
                // Exception escaped
                LOGGER.trace(ignored.getMessage());
             }
          }
       }
    };
}위처럼 직접 OpenApiCustomiser를 구현해서 swagger에 등록하고 있었습니다다. 이 코드를 활용하여 직접 만들어서 적용하면 되겠다 생각하였고 바로 적용하였습니다.
3. Swagger를 직접 커스텀하여 로그인 API 적용하기
먼저 yml에 end-point를 true로 설정하였을 때 문제를 다시 살펴보겠습니다.
1. 요청값, 응답값에 대한 명세가 정확하지 않음.
2. Swagger에 API가 분리되어 보이기 때문에 가독성이 좋지 않음.
3. 로그인 실패에 대한 응답은 403이 아닌 401이 맞음.
이러한 이유로 직접 커스텀하여 적용하였습니다.
제가 작성한 코드입니다.
3.0 커스텀 코드
@Bean
OpenApiCustomizer springSecurityLoginEndpointCustomizer(ApplicationContext applicationContext) {
    FilterChainProxy filterChainProxy = applicationContext.getBean(AbstractSecurityWebApplicationInitializer.DEFAULT_FILTER_NAME, FilterChainProxy.class);
    return openAPI -> {
        for (SecurityFilterChain filterChain : filterChainProxy.getFilterChains()) {
            Optional<UsernamePasswordAuthenticationFilter> optionalFilter =
                    filterChain.getFilters().stream()
                            .filter(UsernamePasswordAuthenticationFilter.class::isInstance)
                            .map(UsernamePasswordAuthenticationFilter.class::cast)
                            .findAny();
            if (optionalFilter.isPresent()) {
                UsernamePasswordAuthenticationFilter usernamePasswordAuthenticationFilter = optionalFilter.get();
                Operation operation = new Operation();
                Schema<?> schema = new ObjectSchema()
                        .addProperties(usernamePasswordAuthenticationFilter.getUsernameParameter(), new StringSchema()._default("email@email.com"))
                        .addProperties(usernamePasswordAuthenticationFilter.getPasswordParameter(), new StringSchema()._default("password"));
                RequestBody requestBody = new RequestBody().content(new Content().addMediaType(org.springframework.http.MediaType.APPLICATION_JSON_VALUE, new MediaType().schema(schema)));
                operation.requestBody(requestBody);
                ApiResponses apiResponses = new ApiResponses();
                apiResponses.addApiResponse(String.valueOf(HttpStatus.OK.value()),
                        new ApiResponse().description(HttpStatus.OK.getReasonPhrase())
                                .content(new Content().addMediaType(org.springframework.http.MediaType.APPLICATION_JSON_VALUE,
                                        new MediaType().example("{\"token\":\"sample-jwt-token\"}"))));

                apiResponses.addApiResponse(String.valueOf(HttpStatus.UNAUTHORIZED.value()),
                        new ApiResponse().description(HttpStatus.UNAUTHORIZED.getReasonPhrase())
                                .content(new Content().addMediaType(org.springframework.http.MediaType.APPLICATION_JSON_VALUE,
                                        new MediaType().example("{\"error\":\"UNAUTHORIZED\"}"))));

                operation.responses(apiResponses);
                operation.addTagsItem("user-controller");
                operation.summary("로그인");

                PathItem pathItem = new PathItem().post(operation);
                openAPI.getPaths().addPathItem("/api/v1/user/sign-in", pathItem);
            }
        }
    };
}3.1 ._default()를 활용하여 Request 명세 작성
Schema<?> schema = new ObjectSchema()
        .addProperties(usernamePasswordAuthenticationFilter.getUsernameParameter(), new StringSchema()._default("email@email.com"))
.addProperties(usernamePasswordAuthenticationFilter.getPasswordParameter(), new StringSchema()._default("password"));._default()를 활용하여 Request에 대한 명세를 작성하였습니다.

3.2 분리된 API를 하나로 합친다.
operation.responses(apiResponses);
operation.addTagsItem("user-controller");
operation.summary("로그인");

PathItem pathItem = new PathItem().post(operation);
openAPI.getPaths().addPathItem("/api/v1/user/sign-in", pathItem);addTagsItem을 사용하여 같은 태그로 묶어주었습니다.
summary를 사용하여 API에 대한 설명을 작성하였습니다.
PathItem을 사용하여 도메인을 제외한 REQUEST_URI를 작성하였습니다.

3.3 로그인 실패 응답 403 -> 401로 작성, 성공 응답 작성
apiResponses.addApiResponse(String.valueOf(HttpStatus.UNAUTHORIZED.value()),
        new ApiResponse().description(HttpStatus.UNAUTHORIZED.getReasonPhrase())
                .content(new Content().addMediaType(org.springframework.http.MediaType.APPLICATION_JSON_VALUE,
                        new MediaType().example("{\"error\":\"UNAUTHORIZED\"}"))));
로그인 실패 응답을 401로 작성하였습니다.
성공 응답을 작성하였습니다.

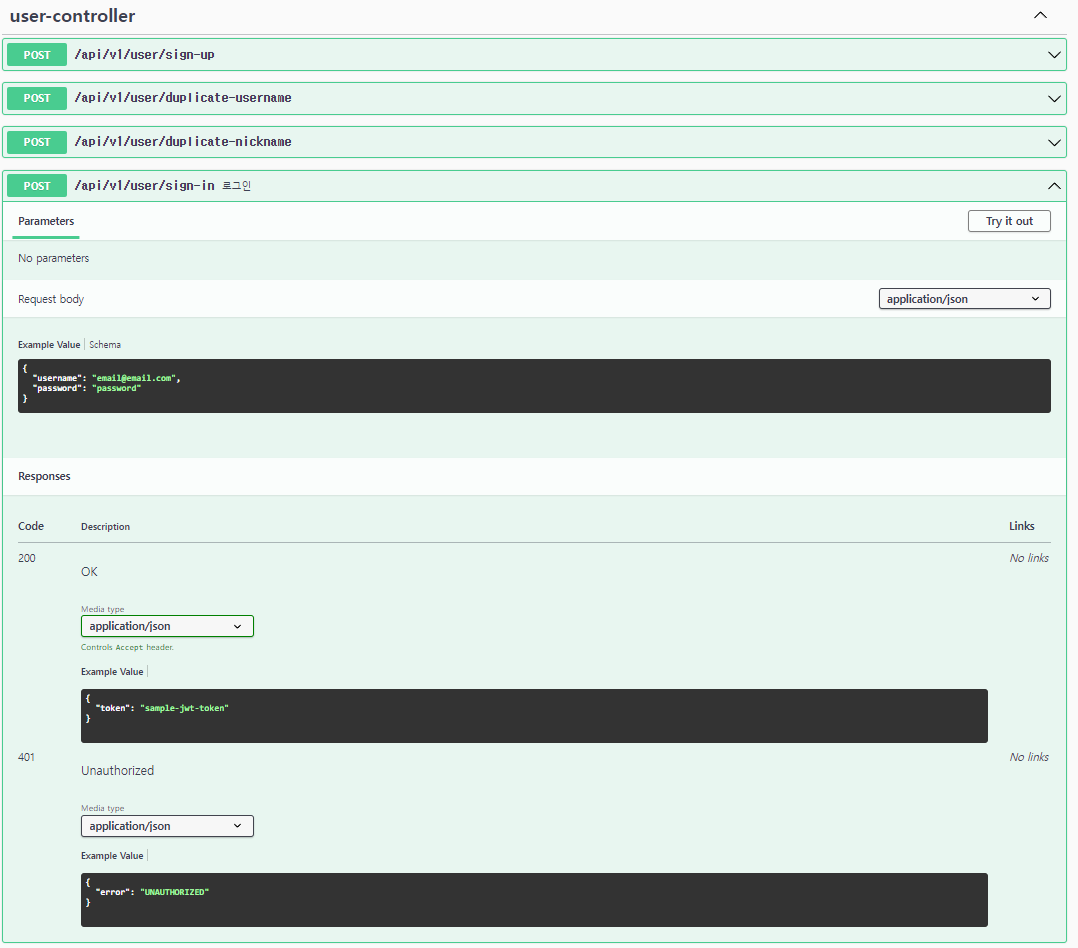
4. 최종 결과

OpenApiCustomizer를 활용하여 Spring Security 기반의 로그인 API를 제공할 수 있습니다.
5. Springdoc에 오픈 소스 기여
직접 커스텀하여 Swagger 문서를 작성하면서, 오픈 소스에 기여할 수 있었습니다.
OpenApiCustomizer를 사용하면서 springSecurityLoginEndporintCustomizer() 메소드에 오타를 발견하여 수정하였고, 로그인 실패에 대한 응답값을 403이 아닌 401로 수정하였습니다.
https://github.com/springdoc/springdoc-openapi/pull/2659
fix: typo in SpringSecurityLoginEndpointCustomizer method name by YunByungil · Pull Request #2659 · springdoc/springdoc-openap
SpringSecurityLoginEndpointCustomiser -> SpringSecurityLoginEndpointCustomizer
github.com
https://github.com/springdoc/springdoc-openapi/pull/2660
fix: Update Response Code by YunByungil · Pull Request #2660 · springdoc/springdoc-openapi
Updated the response code for login failures from 403 Frobidden to 401 UnAuthorized to more accurately reflect the correct HTTP status code for authentication failures. Changes include: Response c...
github.com
Swagger 문서 커스텀을 위해 오픈소스를 직접 활용하였고, 오픈소스에 기여할 수 있었습니다.
6. 마치며
OpenApiCustomizer를 활용하여 직접 커스텀하여 Spring Security 기반의 로그인 API를 제공할 수 있습니다.
사실 소스보다 더 중요한것은 스웨거가 어떤 구조로 되어있는가를 파악해야 합니다.
스웨거의 구조를 이해하시면 좀 더 커스텀하기 편할 수 있습니다.
이번에 오픈 소스를 활용하면서 컨트리뷰트, 스웨거 구조를 확실하게 이해할 수 있었습니다.
'Spring' 카테고리의 다른 글
| WebScoket 실시간 매칭 시스템 - 동시성 문제 발생과 해결 과정 (0) | 2024.06.25 |
|---|---|
| Scale-out 상황, 채팅 서비스 Redis 도입 (0) | 2024.06.20 |
| 좌표값(객체) 테스트에 대한 고민 (0) | 2023.11.25 |
| 테스트 코드 - Presentation Layer (0) | 2023.11.12 |
| CSRF(Cross-Site Request Forgery)란? (1) | 2023.10.19 |
